Monday, September 15, 2014

Soft curls

I love this curling technique! It is super easy, and lasts me longer than any other curled style! It isn't super fast, but that's partially because my hair is so long and thick.


I put the top section of my hair up, if your hair is thinner you may be able to do larger sections than me. But my sections are about 1-2 inches. I tease the roots of each section right before I curl it.

It will look big and weird. This is normal. Don't worry. :)

I hold the curling iron upside down and curl each section around the outside of the barrel (do not use the clamp) away from my face. I usually leave the last inch or less of hair uncurled. Be sure not to burn your fingers!!

Continue this on each section! For the top sections, don't curl hair starting right at the base, but a couple of inches down so the hair falls on your head more naturally.

And this is the finished product!! I hope this look works out for you, and comment if you have any questions!

Tuesday, September 9, 2014

New item coming soon!

I'm in the process of making my next item for my Etsy shop, Crochet Couture KE. I've never put a blanket in my shop before, so I'm sooo excited for this! Stay tuned, I'm working as fast as I can!

Tuesday, August 26, 2014

Poly Chiffon Leopard Scarf

I have been LOVING the look of silk and chiffon scarves lately. It's waaay too hot to wear my crochet scarves during the summer, so I needed another wardrobe staple that could also beat the heat. And these scarves are the lifesaver! They are 100% Polyester, but have the lightweight quality and sheer fabric that I would want in a real chiffon scarf. There are also a million ways to style this scarf, so it can go with any outfit!


Available in my shop on Etsy!


Tuesday, June 10, 2014

Piano Lessons

Calling all people in the Provo/Orem Utah area!! I am teaching piano lessons this summer! I may extend lessons into the fall as well, but that is dependent upon my class schedule. I hope I can keep teaching! But I am teaching all summer long. If you are interested in lessons or know somebody who is, send them my way! My contact information is on the flyer. I have played piano for 14 years and love teaching others how to play! 


Tuesday, May 27, 2014

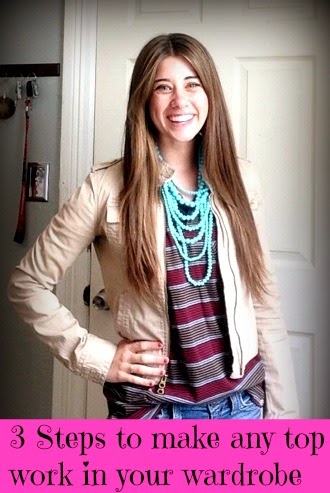
How to make any top work in your wardrobe


I hate when I look at Pinterest or blogs and I see a fabulous outfit, but I'm missing some key piece. It happens to me seriously every day. I would like to just go shopping all the time and get whatever I need (ha like that could EVER be possible), because then I could wear super cute outfits! But the reality is that I have what I have. And you have what you have. So that's what we have to work with. And I've realized that that's totally OK. After watching countless hours of What Not To Wear, I've learned that the key to making an outfit work is getting pieces to work together. Very rarely will you have some magical top or skirt or something that just looks perfect all by itself. You need to put things together! So here are my 3 steps to making any item work in your wardrobe!

For this tutorial I looked through the closet and found this shirt. It is my husband's, it's huge on me! I have literally never seen this shirt before. I can see why my husband never wears it. But if he doesn't wear it, I will!! So here are the steps!!


1. Hide it

I know what you're thinking. If I'm going to hide it, why am I even wearing it at all? Well, you're not hiding it completely. You're going to use the piece to add something exciting to another piece. The things that make an outfit exciting are color, pattern, texture, and shine. So I could just wear this sweater by itself...


Displaying MyDressing.png

Or I could put the striped shirt under it so that I have a pattern in my outfit!


2. Layer

I am in love with jackets. I have way too many, but they're all just so cute! And they make my outfits sooo much better. If your top you're using is way too big, tuck the front into your pants. This is really "in" right now, I see people do this all the time. So tuck the front in, and put the jacket on top. It won't matter if your top is huge or anything, because the jacket will hide that.

3. Bling!!!

Jewelry completes an outfit. It just creates this feeling that everything is finally finished and that your outfit isn't missing anything else. So find a necklace that goes with your outfit and you're set! I try to go with a statement necklace, it adds a little more variety to the outfit. But be careful, if for example you're wearing a cardigan with some textured detail, you may want to pick a simpler necklace. It's all about making sure things are balanced out.

And here is the final product with a jacket and a necklace!! It's so cute!!! And who knew I could've ever worn this random shirt I found in my husband's closet? :)


Wednesday, April 23, 2014

At-Home Salon Blowout


I don't know about you, but my days always seem to go better when my hair is blow-dried nice! It can be hard sometimes to make the time to blowdry my hair, but when I do it it's totally worth it. It really doesn't take that long, and it lasts for days. So here are my techniques on getting a salon blowout (without spending tons of money going to the salon!).

(BTW, this is my first video tutorial! If you have any questions, comments, or suggestions, let me know. I'm totally open to new ideas and knowing what I can do to improve!)


Friday, April 18, 2014

Work Makeup

Makeup. It's a delicate art, and takes a lot of practice. And then there's the problem of which makeup look is appropriate for which situation. Everyday makeup shouldn't be too heavy, formal occasions allow for more intense colors, etc etc etc etc. The list goes on forever. Today I'm going to cover doing your makeup for a day at work. Your makeup in the office (or wherever you work--I have an on-campus job) should be classy, look natural, but also look like you put some effort into it. There are some obvious dont's.

This is too much makeup. Your foundation should not be totally caked on your face.
So let's go over a simple makeup look appropriate for work.

Much better than the previous picture, right?


1. Moisturize.

First of all, be sure to start with a clean face. After any previous makeup is washed off, moisturize! This step is so important for your skin. Do NOT skip it!

2. Primer

This step is not necessary, especially if you're in a rush, but it really does help throughout the day.


I use a drop about the size of a pea.

3. Foundation

Wait for the primer to dry, then apply foundation. I use the Dream Fresh BB Cream, so I just put a little bit on my fingers and rub it into my face.


And this is with just the primer and foundation on.

4. Concealer

Again, this step is not necessary, but if you have blemishes or red spots or anything, I would highly recommend this step.


5. Powder

Depending on the time of year, I use a different product with this step. I have a powder that came with a foundation during the winter when my skin is lighter, but as my skin starts getting darker I use Bronze Goddess bronzer. I don't powder my face on normal days because I don't think it's necessary for a natural everyday look, but for work it makes the face look more put together.


6. Eyeshadow

I move on to my eyes next. I use this Estee Lauder eyeshadow with two colors inside, but you can use any eyeshadow you like, just make sure that you have two colors: a dark color and a light one. To apply this, I first use the darker color and apply a little bit under my eye. On my upper eyelid, I apply from the outside corner up into the crease. With the lighter color, I simply apply it on the lid of my eye (don't go all the way up to the crease) and on the brow bone.


My left eye (the one on your right) has the white eyeshadow applied on the lid, while my right eye doesn't. Notice how it opens up your eye and makes you look more awake?


 7. Eyeliner

I use some black E.L.F. eye shadow as my eyeliner. My brush is actually a concealer brush, but different types of brushes would probably work too.

 I apply a line of the eyeshadow lining the top of my eye. (My left eye has the line, my right doesn't).

I then put a little more eye shadow on my brush and smudge it up from the previously applied line into the crease. (Again, my left eye has it, right eye doesn't).

8. Mascara

I usually use two different mascaras. I have an Estee Lauder sample or Covergirl that I will use first, then after that dries I apply Covergirl highlights on top. I have the color designed for blue eyes and it is seriously magic in bringing out my eye color.


9. Bronzer and Blush

I went to the Mac counter and had the lady there help me pick out colors. I would really recommend this, my makeup automatically looked so much better without changing anything except for the colors I was using! So I apply my bronzer from my ear towards my mouth, just below the cheekbone. Then I apply the blush just below my cheekbone again, but coming more towards my nose. However, I do not apply blush any closer than two fingers width from my nose. If you put blush super close to your nose you look like a baby doll with red cheeks. 


Here is my bronzer and blush. I try to do it really lightly so it looks natural.

10. Lipstick/gloss

I don't always put something on my lips, but when I do I usually put this MAC lipstick. It's called "Hug Me" and is a great neutral color.


Finished!! Here is the completed look! Thanks for reading my tutorial. If you have any questions, comments, or suggestions, please comment below!